Install Dependencies

Most computer vision tasks would require dependencies such as dlib and opencv. We will walk through how to install the dependencies, and the problems we encountered and how we resolved them. Installing these dependencies is non-trivial task, it might vary for different system setups. We only show you the story on OSX El Captain, therefore can not guarantee this will work on other setups.

OpenCV

Dlib

dlib is a wellknown C++ library containing many useful machine learning routines. It is widely used in face related tasks. Mostly you would follow the instructions on their git repo to compile your own programs. In our case, we need compile the dlib python API by running,

$ python setup.py install --yes USE_AVX_INSTRUCTIONS

In order to check if your CPU support AVX, on Mac you can run,

$ sysctl -a | grep machdep.cpu.leaf7_features

This will gives you output like,

machdep.cpu.leaf7_features: SMEP ERMS RDWRFSGS TSC_THREAD_OFFSET BMI1 AVX2 BMI2 INVPCID FPU_CSDS

See if you have AVX2 in your output, if yes, then you can compile your python API with the USE_AVX_INSTRUCTIONS option, otherwise just leave it none. Unfortunately during the compiling we got the compile error complaining that Boost.Python is not found, then we realized that dlib relies on Boost Libraries which is another C++ libraries, so what is it?

Boost C++ Library

Boost is a set of libraries for the C++ programming language that provide support for tasks and structures such as linear algebra, pseudorandom number generation, multithreading, image processing, regular expressions, and unit testing. It contains over eighty individual libraries.

from wikipedia

Install the headers and binaries of Boost for Python is actually pretty handy. After download the tarball (we are using version 1.65.1), just uncompress it in your own BOOST_ROOT_PATH. All the headers are in the subfolder boost. If you don’t need other binaries, you can just include the headers in your own C++ programs. However, since we need Python bindings, therefore there’s additional steps to do.

To compile the python extensions, you must follow the instruction by specifying the python binding using the script provided,

$ ./bootstrap.sh --prefix=path/to/installation/prefix --with-libraries=python --with-python=path/to/python

Since we only need python extensions, so only python is specified in --with-libraries. The default installation path is /usr/local/. After successfully compiled the python bindings, you can now go back to compile dlib Python binaries.

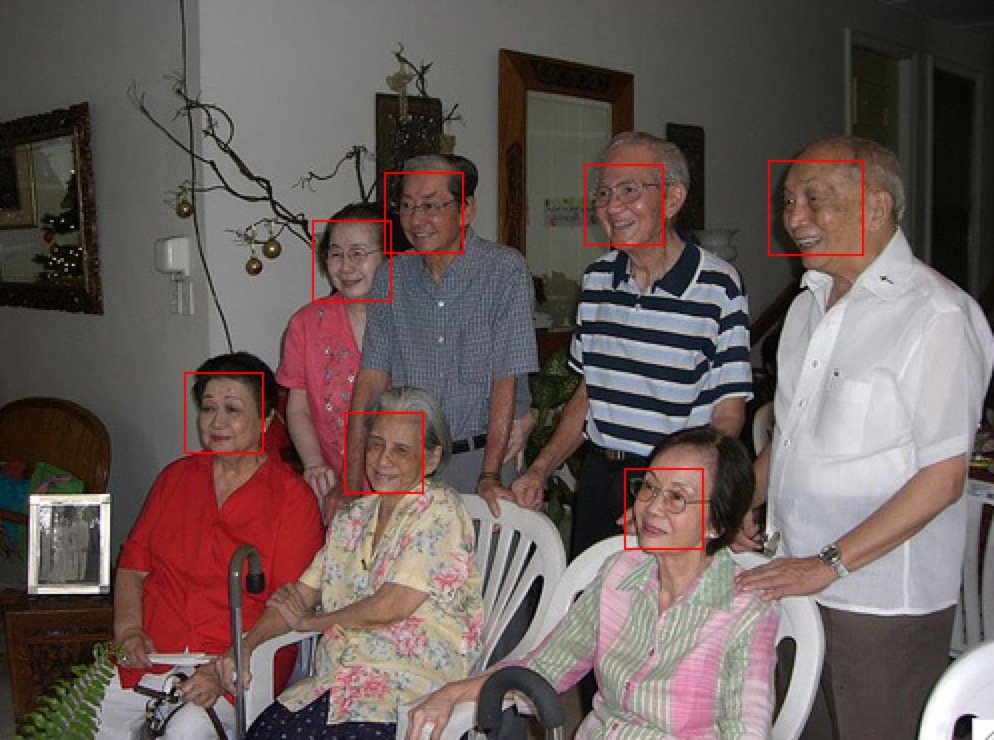
Face detection example in Dlib

After successfully compiled Dlib Python binaries, you can try out the Python examples in DLIB_ROOT/python_examples/, e.g., cnn_face_detector.py

#!/usr/bin/python
# The contents of this file are in the public domain. See LICENSE_FOR_EXAMPLE_PROGRAMS.txt
#
# This example shows how to run a CNN based face detector using dlib. The
# example loads a pretrained model and uses it to find faces in images. The
# CNN model is much more accurate than the HOG based model shown in the
# face_detector.py example, but takes much more computational power to
# run, and is meant to be executed on a GPU to attain reasonable speed.
#
# You can download the pre-trained model from:
# http://dlib.net/files/mmod_human_face_detector.dat.bz2
#
# The examples/faces folder contains some jpg images of people. You can run
# this program on them and see the detections by executing the
# following command:
# ./cnn_face_detector.py mmod_human_face_detector.dat ../examples/faces/*.jpg
#
#
# COMPILING/INSTALLING THE DLIB PYTHON INTERFACE
# You can install dlib using the command:
# pip install dlib
#
# Alternatively, if you want to compile dlib yourself then go into the dlib
# root folder and run:
# python setup.py install
# or
# python setup.py install --yes USE_AVX_INSTRUCTIONS --yes DLIB_USE_CUDA
# if you have a CPU that supports AVX instructions, you have an Nvidia GPU
# and you have CUDA installed since this makes things run *much* faster.
#
# Compiling dlib should work on any operating system so long as you have
# CMake and boost-python installed. On Ubuntu, this can be done easily by
# running the command:
# sudo apt-get install libboost-python-dev cmake
#
# Also note that this example requires scikit-image which can be installed
# via the command:
# pip install scikit-image
# Or downloaded from http://scikit-image.org/download.html.
import sys
import dlib
from skimage import io
if len(sys.argv) < 3:
print(
"Call this program like this:\n"
" ./cnn_face_detector.py mmod_human_face_detector.dat ../examples/faces/*.jpg\n"
"You can get the mmod_human_face_detector.dat file from:\n"
" http://dlib.net/files/mmod_human_face_detector.dat.bz2")
exit()
cnn_face_detector = dlib.cnn_face_detection_model_v1(sys.argv[1])
win = dlib.image_window()
for f in sys.argv[2:]:
print("Processing file: {}".format(f))
img = io.imread(f)
# The 1 in the second argument indicates that we should upsample the image
# 1 time. This will make everything bigger and allow us to detect more
# faces.
dets = cnn_face_detector(img, 1)
'''
This detector returns a mmod_rectangles object. This object contains a list of mmod_rectangle objects.
These objects can be accessed by simply iterating over the mmod_rectangles object
The mmod_rectangle object has two member variables, a dlib.rectangle object, and a confidence score.
It is also possible to pass a list of images to the detector.
- like this: dets = cnn_face_detector([image list], upsample_num, batch_size = 128)
In this case it will return a mmod_rectangless object.
This object behaves just like a list of lists and can be iterated over.
'''
print("Number of faces detected: {}".format(len(dets)))
for i, d in enumerate(dets):
print("Detection {}: Left: {} Top: {} Right: {} Bottom: {} Confidence: {}".format(
i, d.rect.left(), d.rect.top(), d.rect.right(), d.rect.bottom(), d.confidence))
rects = dlib.rectangles()
rects.extend([d.rect for d in dets])
win.clear_overlay()
win.set_image(img)
win.add_overlay(rects)
dlib.hit_enter_to_continue()

The result of face detections looks like following. The python code is self explanatory. Next, we will look into how to code your own recognition model using Mxnet.